|
|
🦋 Tin-can Cello: steps and tools (updated)
Work plan for building the Tin-can cello (this post is changing a bit, I'm just going to edit it inline; further edits in comments):
- Flatten bottom of neck: this will be the reference flat when cutting on the bandsaw. Plane entire length of board flat and straight. For reference, this is going to be parallel to the plane of the washtub's base. [note I never planed it flat, at all.]
- Mark up neck: draw outlines of the dowel and the neck on the board. Draw outline on the top of the board (i.e. opposite the side that was planed in step 1) and on one side. Use cardboard cut into shape of tub profile to determine where the dowel will go into the bucket.
- Cut around the outlines on bandsaw.
- Rough out dowel and neck. Finish dowel so it is straight and true. Mark up pegbox and scroll. Drill pilot holes for pegs.
- Mark entry for dowel on bucket. Cut open using angle grinder. Mark exit hole for dowel. Cut open.
- Fit dowel into bucket. True up heel.
- Finish shaping neck, carve pegbox and scroll. Attach nut and fingerboard to neck.
- Mount tailpiece; put A and C strings on, loose.
- Mark up and carve bridge.
- Set up cello.
posted evening of Sunday, August 12th, 2018
➳ More posts about The Tin-can Cello
➳ More posts about Projects
➳ More posts about Luthery
➳ More posts about Woodworking

A second thought wrt markup and cutting of the dowel and neck: it might be more efficient to do markup on the side of the board, and cut through the thickness on the bandsaw, prior to marking up and shaping the width; since the width of the raw board is double the thickness and since my bandsaw skills are pretty raw.
posted morning of August 14th, 2018 by Jeremy Osner

Probably the best thing is starting with the dowel. I can cut through the thickness, then begin cutting through the width and see how that goes, and fallback to plan b if I'm having a hard time.
posted morning of August 14th, 2018 by Jeremy Osner

More thought on steps (2) and (3):
2. Mark up neck
3. Cut around the outlines on a bandsaw sort of understates the task.
I think the thing to do is expand these two steps as follows:
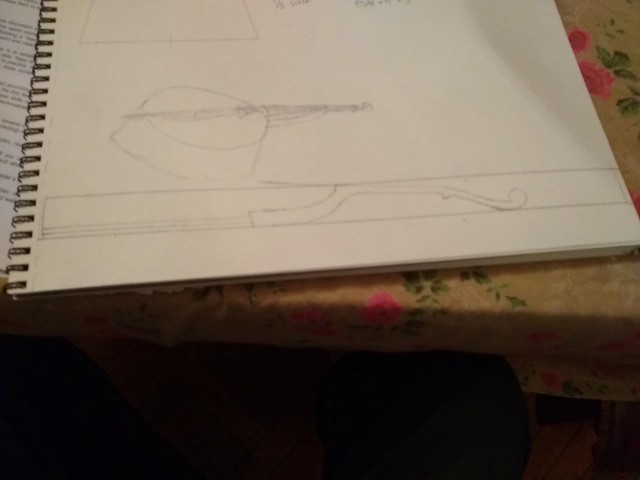
2. layout/mark up the *side* of the board only.
3. The first cut on the bandsaw will be to cut through the board completely, discarding fairly large mass of wood, and leaving a neck and dowel that are both the full thickness of the board.
4. Mark up the dowel and neck (and blank pegbox/scroll) along the sawn surface.
5. Cut the dowel and neck down with a combination of bandsaw, handsaw and drawknife. and then you're back to step (4) above, renumbered as appropriate. The layout in (2) looks like,

posted evening of August 15th, 2018 by Jeremy Osner
| |
|
Drop me a line! or, sign my Guestbook.
•
Check out Ellen's writing at Patch.com.
| |

